As a keen gardener devoted to natural growing practices, I find that every season presents its own unique challenges. Winter, with its chilling frosts, can be particularly tough on our beloved plants. One of my favourite and most effective strategies to protect my greenhouse during this cold period is using bubble wrap. Not only is it an affordable and eco-friendly solution, but it also works wonders in maintaining a stable temperature inside the greenhouse. I’m excited to share how you can use bubble wrap to keep your plants safe and thriving even in the heart of winter.
Why Bubble Wrap is Effective
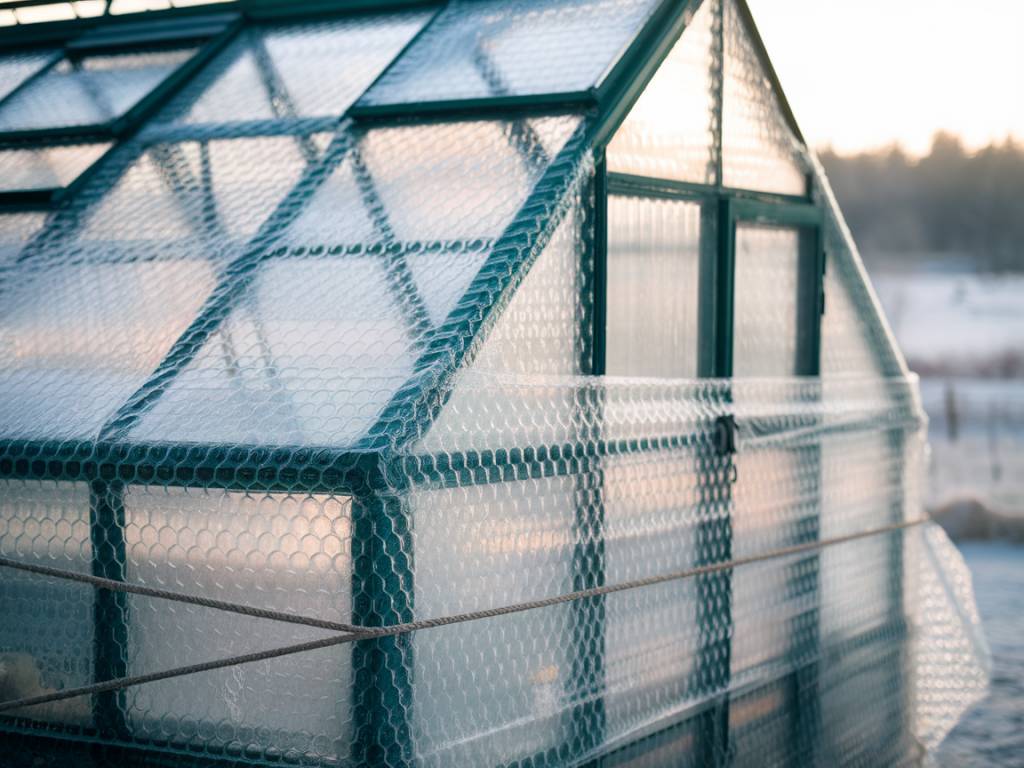
Bubble wrap acts as an excellent insulator due to its unique structure. The bubbles trap air, which provides a thermal barrier that helps retain heat within the greenhouse. This can significantly reduce heat loss and protect plants from frost damage. Unlike other insulating materials, bubble wrap is lightweight and flexible, making it easy to install and remove when needed.
Choosing the Right Bubble Wrap
Not all bubble wraps are created equal. For greenhouse insulation, it’s crucial to choose bubble wrap with larger bubbles, as they trap more air and provide better insulation. Opt for UV-stabilised bubble wrap, designed to withstand exposure to sunlight without degrading, ensuring it lasts through the winter and beyond.
Preparing Your Greenhouse
Before you start wrapping, ensure your greenhouse is clean and free from any debris. A clean environment will help the bubble wrap adhere better and do its job more effectively. Check for any damaged panels or gaps and repair them to maximise the insulation effect.
Installing Bubble Wrap
Now comes the fun part! Here are the steps to properly install bubble wrap in your greenhouse:
- Start by measuring the area you intend to cover. Cut the bubble wrap into manageable pieces according to these measurements.
- Use clips or adhesive to attach the bubble wrap to the greenhouse frame. Clips are preferable as they are easier to remove when the season changes.
- Ensure the bubble side is facing the glass or plastic panels of your greenhouse. This orientation optimises the insulation properties.
- Overlap the edges of the bubble wrap to avoid any gaps where cold air could seep through. Secure these overlaps with adhesive tape or additional clips.
- Be particularly attentive to covering any vents or openings, but remember to leave a little room for ventilation to prevent mould and mildew.
Caring for Your Insulated Greenhouse
Once your bubble wrap is installed, keeping an eye on the greenhouse environment is essential. Regularly check the temperature and humidity levels to ensure they remain stable. While bubble wrap provides excellent insulation, your plants will still need adequate ventilation and water.
Maximising Insulation with Additional Measures
While bubble wrap does a fantastic job, combining it with other insulating strategies can offer even better results:
- Use a thick layer of mulch on the soil inside your greenhouse. Mulch acts as an additional insulator, keeping the roots of your plants warm.
- Install thermal curtains or blinds for extra insulation during the coldest nights.
- Place water-filled containers in your greenhouse. During the day, these will absorb heat, gradually releasing it overnight to maintain a consistent temperature.
Reusing and Recycling Bubble Wrap
One of the beauties of using bubble wrap is its reusability. After the winter season is over, carefully remove the bubble wrap and store it for the next year. If you find it starting to degrade, many recycling centres accept bubble wrap, preventing it from ending up in landfills. Reusing bubble wrap aligns perfectly with natural gardening principles, ensuring we minimise waste and maximise resources.
Common Issues and Troubleshooting
Though bubble wrap insulation is straightforward, you might encounter some common issues:
- Condensation: If you notice excessive condensation, it might be due to insufficient ventilation. Ensure your greenhouse has proper airflow to prevent mould and mildew.
- Slipping Wrap: If the bubble wrap slips or falls off, try using more clips or stronger adhesive. Keeping the surface clean before application also helps improve adhesion.
- Damaged Wrap: Over time, bubble wrap can get damaged. Check regularly for tears or holes and patch them with adhesive tape to maintain insulation efficiency.
The Benefits Beyond Insulation
Aside from its primary role in insulation, bubble wrap can offer other benefits for gardeners:
- It can diffuse sunlight, providing a softer and more even light distribution inside the greenhouse, beneficial for some sensitive plants.
- The bubble wrap layer can help reduce water evaporation from the soil, conserving moisture and ensuring your plants stay hydrated longer.
- In unexpected frost periods outside the typical season, bubble wrap can quickly be reinstalled to provide temporary protection for vulnerable plants.
Seasonal Transition
As the cold months give way to warmer weather, gradually transition your greenhouse back to its regular state:
- Remove the bubble wrap slowly to allow plants to acclimatise to the changing temperatures.
- Store the wrap in a cool, dry place to ensure it is in good condition for next winter.
- Take this opportunity to thoroughly clean your greenhouse and check for any repairs that might be needed.
Using bubble wrap to protect your greenhouse from frost is a simple, effective, and eco-friendly method. It helps maintain a stable, warm environment for your plants, ensuring they thrive even during the harshest winter conditions. Happy gardening!
Samanta

